
How to automate UI Testing from scratch
Learn how to implement effective UI testing from the ground up, ensuring your applications are both robust and user-friendly.

UI tests are essential for ensuring your application functions correctly and looks right across different contexts. They verify everything from proper user interactions such as form submissions—including validation errors, confirmation messages, and successful submissions—to how component layouts adapt to different viewports, themes, and localization settings. By catching these critical issues in one process, UI testing safeguards the user experience.
Despite all its benefits, frontend teams struggle to adopt UI testing because they believe they have to make a tradeoff between end-to-end testing tools, which are complex to set up and maintain often slow to run, and unit testing frameworks that, while faster, often run in a simulated browser environment therefore not verifying actual rendered UI.
However, the landscape of UI testing tools has evolved rapidly. The frontend ecosystem offers new options that combine the ease and speed of unit tests with the ability to run tests in a real browser and simulate user interactions much like end-to-end tests.
In this comprehensive guide to UI testing, we explore what needs testing, recommend tools that offer the best developer experience, and explain how to integrate them into an effective testing strategy.
What is UI testing?
Simply put, UI testing is the process of validating that the visual and interactive elements of an interface work and look as they’re intended to. But modern applications are large and complex and this definition encompasses a lot of considerations.
Modern applications have to account for fetching data, responding to user interactions and dynamically updating the UI. Their interface adjusts based on device settings, user preferences, and screen size. Therefore, there is a lot of variability that needs verification through applicable testing.
We can break down these aspects into fundamental concepts, each corresponding to a different type of UI test. To effectively catch bugs throughout your entire frontend, you need to combine them into a cohesive testing strategy.
- Logic: Is the underlying application logic correct (e.g.: logic for adding items to a cart or calculating tax based on the user’s location)?
- Visual: Does the UI render correctly in different app states and variations?
- Functional: Does the component respond to user interactions and update accordingly?
- Accessibility: Does the UI adapt to the user’s needs (i.e.: screen readers & keyboard-only navigation)?
- User flows: Can users complete core functionalities across multiple pages?
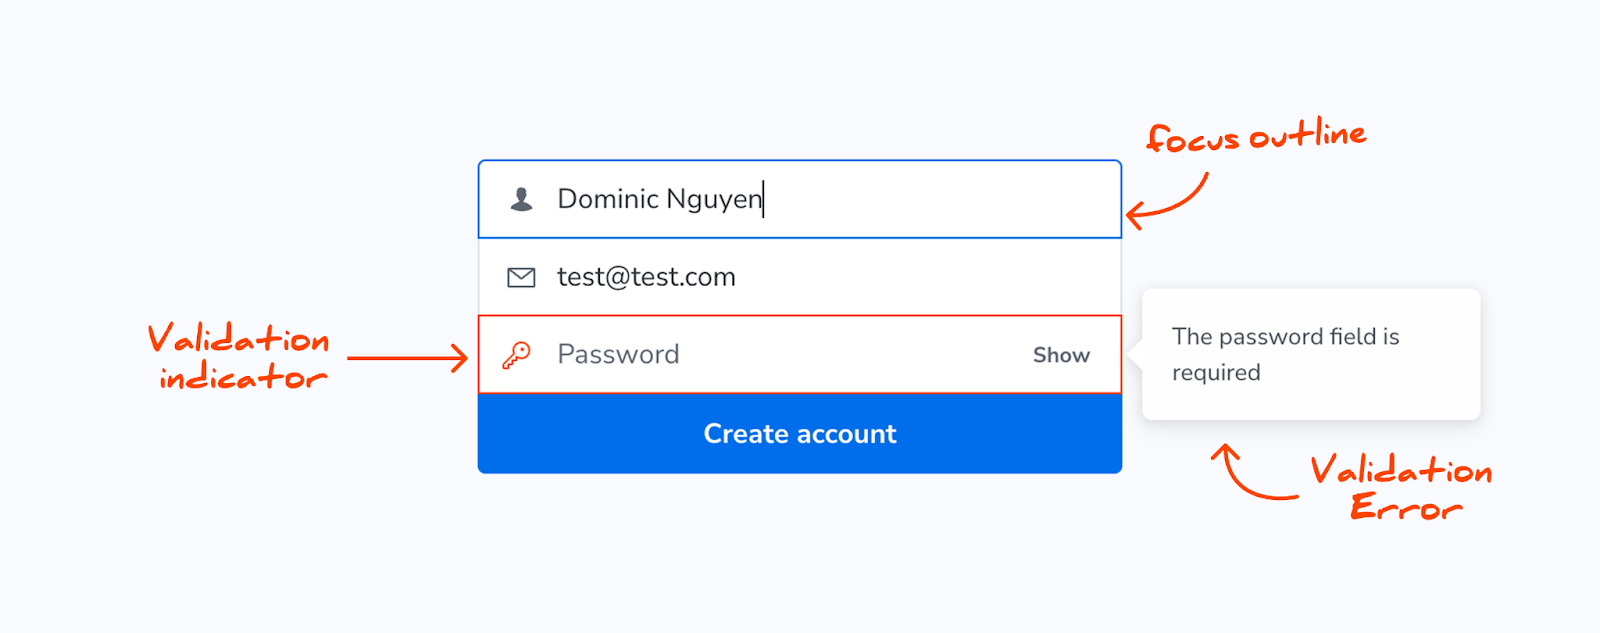
Consider a simple contact form submission. UI testing can verify many aspects of its appearance and behavior, such as:
- Showing focus outlines on input fields as users type (visual).
- Validating user input (functional).
- Displaying error messages (functional and visual).
- Exposing errors to screen readers (accessibility).
- Handling translated text and lengthy inputs without breaking layout (visual).
UI Testing ≠ UX Testing
UI (user interface) testing is often confused with UX (user experience) testing. However, they are separate things that help your team in different ways, and at different stages.
UI testing validates application behavior and how the interface renders in the browser. In contrast, UX testing evaluates whether users can complete specific tasks using a given interface. This process involves real users interacting with your application while researchers collect performance metrics and feedback on their experience.
Why test UIs?
1. UI Testing helps you catch bugs early
When UI issues make it to production, they erode user trust and make your app harder to use. Testing helps you catch bugs early before your users do. Plus, research shows that it takes 5-10 times longer to fix bugs once they've hit the production environment compared to fixing them during development.
2. Tests help you ship faster
Another valuable side effect of testing is that it helps you deliver new features faster. Well-tested code is more reliable, particularly when tests are automated in the pull request process. This boosts your team's confidence in their code, allowing for quicker updates.
How to test UIs
In modern frontend development, we work with components and data fetching. We start with smaller, basic components such as buttons, labels, and links. We then progressively combine them to assemble pages. This modular approach can be leveraged to make testing easier.
Let’s explore each type of test that falls under UI testing and the tools and techniques available to craft an effective testing strategy.
Test logic with unit tests
Typically some of the logic in your frontend application is written as pure functions that are later integrated into components. Unit tests are ideal for verifying that this type of code works correctly. They require minimal effort to write and maintain, making it easy to test complex functions with various logic branches.
Which tools to use?
Vitest provides fast unit testing with excellent support for modern JavaScript features, native ECMAScript modules and TypeScript. Vitest even integrates well with code editors using extensions such as Vitest VS Code extension, allowing developers to run and debug tests directly in their editor.
Here's an example testing the calculateSnapshots module, which supports three types of calculations. This test covers all types by providing sample input and asserting that the output matches expectations.
import { expect, test, describe } from 'vitest';
import { calculateSnapshots } from './calculateSnapshots';

describe('calculateSnapshots', () => {
  test('Calculates snapshots', () => {
    const results = calculateSnapshots(2, 10, 1, 1, 20);
    expect(results).toEqual({
      snapshots: 40,
      turboSnaps: 0,
      billedSnapshots: 40,
    });
  });

  test('Calculates snapshots with accessibility enabled', () => {
    const results = calculateSnapshots(2, 10, 1, 1, 20, true);
    expect(results).toEqual({
      snapshots: 20,
      turboSnaps: 10,
      billedSnapshots: 22,
    });
  });

  test('Calculates snapshots with TurboSnap enabled', () => {
    const results = calculateSnapshots(50, 1, 2, 2, true, true, 20);
    expect(results).toEqual({
      billedSnapshots: 92,
      snapshots: 60,
      turboSnaps: 160,
    });
  });
});
While Jest remains widely used, it has slower development cycles and has struggled to provide stable ESM support, making Vitest the better choice for new codebases.
What to focus on?
Unit tests work best for code separate from the UI. Much of the application logic supporting the UI is composed of pure functions, making them ideal for unit testing. It’s best to avoid unit testing logic that is intertwined with the UI, because it results in more complex and fragile tests.
Verify functionality with interaction tests (aka component tests)
UI interaction tests, also referred to as component tests, verify that your application's interface renders correctly and responds as expected to user actions. These tests simulate clicks, typing, and form submissions directly in the browser, ensuring UI functionality under various combinations of data, state, and user interactions.
Much of your frontend code consists of components that render HTML and CSS based on application state. Squint, and you’ll notice that components resemble logic functions described in the unit tests section above. Components take data as input and output UI. The key difference is how their logic responds to user interactions. By testing individual components in isolation, you can validate this interaction-driven logic without the overhead of setting up a full application environment.
Which tools to use?
Testing the rendered output of components has historically been challenging. Most testing tools are designed to function in a Node.js environment using a simulated DOM. These tests typically generate HTML as a string, requiring complex assertions to validate its structure, and making debugging a frustrating experience.
Storybook addresses this problem by enabling you to run and debug tests in an actual browser. You begin by creating a stories file to define the component being tested. You then write individual stories to showcase various component variations including default, error, and empty states. These stories effectively serve as your test cases. Finally, you attach a play function to a story to mimic user interactions (like clicks, hovering, and typing) and execute assertions.
Storybook runs tests in a real browser allowing you to interactively debug them using standard browser devtools. Additionally, you can use Storybook’s interactions debugger to walk through each test step.
The tests are written using the Vitest API for assertions and Testing Library API for queries and interactions. For example, the test below verifies that the user can successfully submit the login credentials by mimicking input events and asserting that the onSubmit callback fires.
import type { Meta, StoryObj } from '@storybook/react-vite';
import { expect } from 'storybook/test';
import { LoginForm } from './LoginForm';

const meta = {
  component: LoginForm,
} satisfies Meta<typeof LoginForm>;
export default meta;

type Story = StoryObj<typeof meta>;

export const EmptyForm: Story = {};

export const SubmitForm: Story = {
  args: {
    onSubmit: fn(),
  },
  play: () => {
    async ({ canvasElement, args }) => {
      const canvas = within(canvasElement);

      const emailInput = canvas.getByLabelText(/email/i);
      await userEvent.type(emailInput, 'support@chromatic.com');

      const submitButton = canvas.getByRole('button', { name: /submit/i });
      await userEvent.click(submitButton);

      await waitFor(() => {
        expect(args.onSubmit).toHaveBeenCalled();
      });
    };
  },
};
Another solid option is Vitest browser mode using Playwright to run tests in a real browser. However, Storybook offers more to developers, because it can reuse the same set of stories for component tests, visual tests, and accessibility tests.
What to focus on?
When it comes to testing, a good rule of thumb is: "Write tests. Not too many. Mostly integration".
Component-driven interaction tests (or component tests) are considered integration tests because of how we build apps today. These tests validate that different services and components work together correctly. This validation is vital due to the ever-increasing complexity of modern app infrastructure, where many APIs and libraries must be compatible for your app to perform as intended.
Component tests allow you to isolate individual components and verify their functionality and integration with other layers of your application. While unit tests focus on logic separate from the UI and E2E tests evaluate the entire page, component tests bridge the gap between the two. They assess both UI and logic throughout the development process, ensuring there are no surprises at the end.
Ensure that the UI looks right with visual tests
Visual tests are a powerful tool for identifying visual all intended and unintended regressions in your application’s interface. First, they capture a snapshot of the UI rendered in a cloud-based browser. Next, you manually review and accept this snapshot as a baseline if it’s appearing as intended. With each code push, a new snapshot is taken and compared to the established baseline to identify visual changes automatically. If changes are detected, you are prompted to either confirm them as intentional and set them as a new baseline or address them as bugs.
Which tools to use?
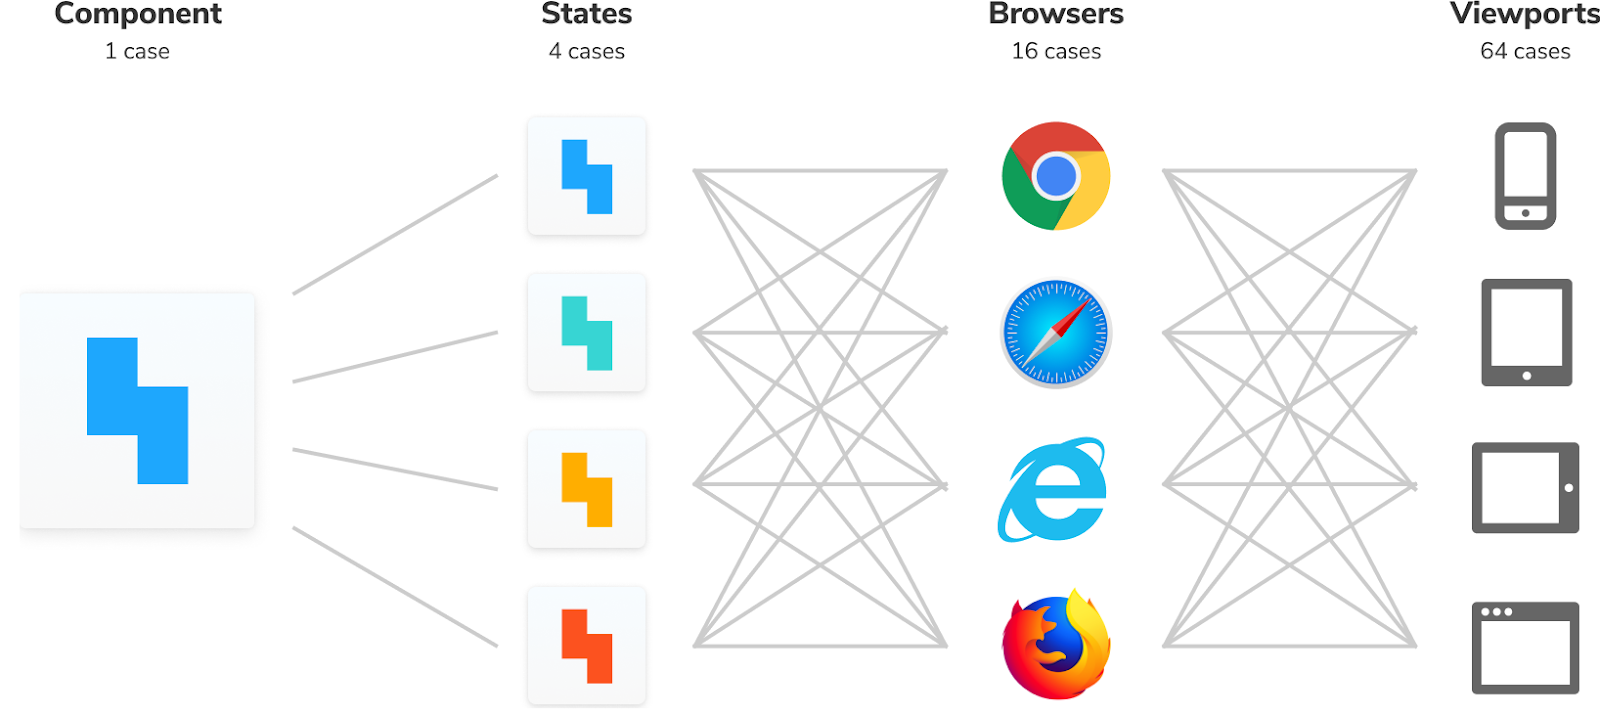
Modern interfaces have to handle a vast array of variations, influenced by factors such as user settings and application state. This complexity exponentially increases the difficulty of ensuring a consistent and correct appearance of the UI across all user devices and browsers.
Chromatic offers a component-centric approach by reusing stories for visual tests. Stories already capture all the variations of a component. Chromatic renders, snapshots, and runs regression checks on them to provide broad visual test coverage. It also manages the infrastructure required to run all these tests concurrently and quickly in a cloud environment.
Playwright offers an alternative by enabling you to use E2E tests to capture screenshots and run regression logic. However, this requires significant setup and maintenance overhead, and it doesn't provide a regression review workflow. It’s also very challenging to write E2E test cases for all these variations of the UI.
What to focus on?
Visual tests prevent visual bugs from creeping into production ensuring a consistent user experience across each state of your application. This results in significant time savings because it eliminates the need to manually check every variation of the UI across all browsers and viewports.
Most visual testing tools require you to either modify your test scripts with a snapshot command or write separate test cases for visual tests. However, when you combine Storybook with Chromatic, your existing stories are automatically converted into visual tests. This integration provides robust coverage without any additional overhead.
Accessibility tests ensure your app is usable by everyone
Users interact with a UI in various ways, including visually, via mouse, touch screen, keyboard, and screen reader. Accessibility focuses on making websites usable for everyone.
To effectively evaluate the accessibility of your application, start with automated tests to catch obvious violations from navigation options to color contrast. Follow up with manual testing to identify usability issues and unexpected behaviors that test automation might miss.
Which tools to use?
axe-core powers most automated accessibility testing tools. The most common approach is to run page-level checks, where scans are conducted page by page to generate an audit report. This tends to be inefficient and results in a high volume of violations, making it difficult to pinpoint the specific component responsible for an issue across multiple pages.
Storybook and Chromatic run accessibility tests at the component-level, where issues are easier to identify and fix, which typically leads to cascading issues being resolved.
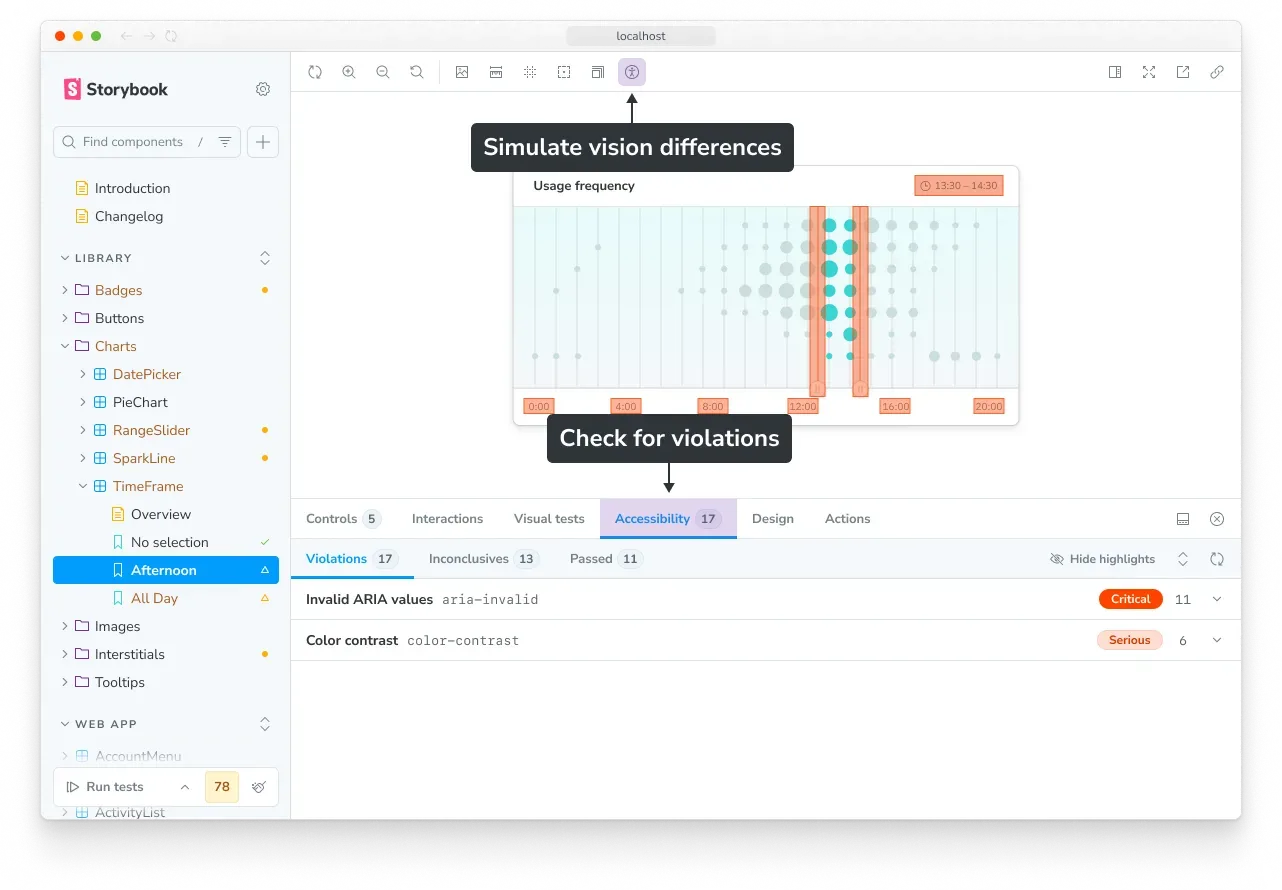
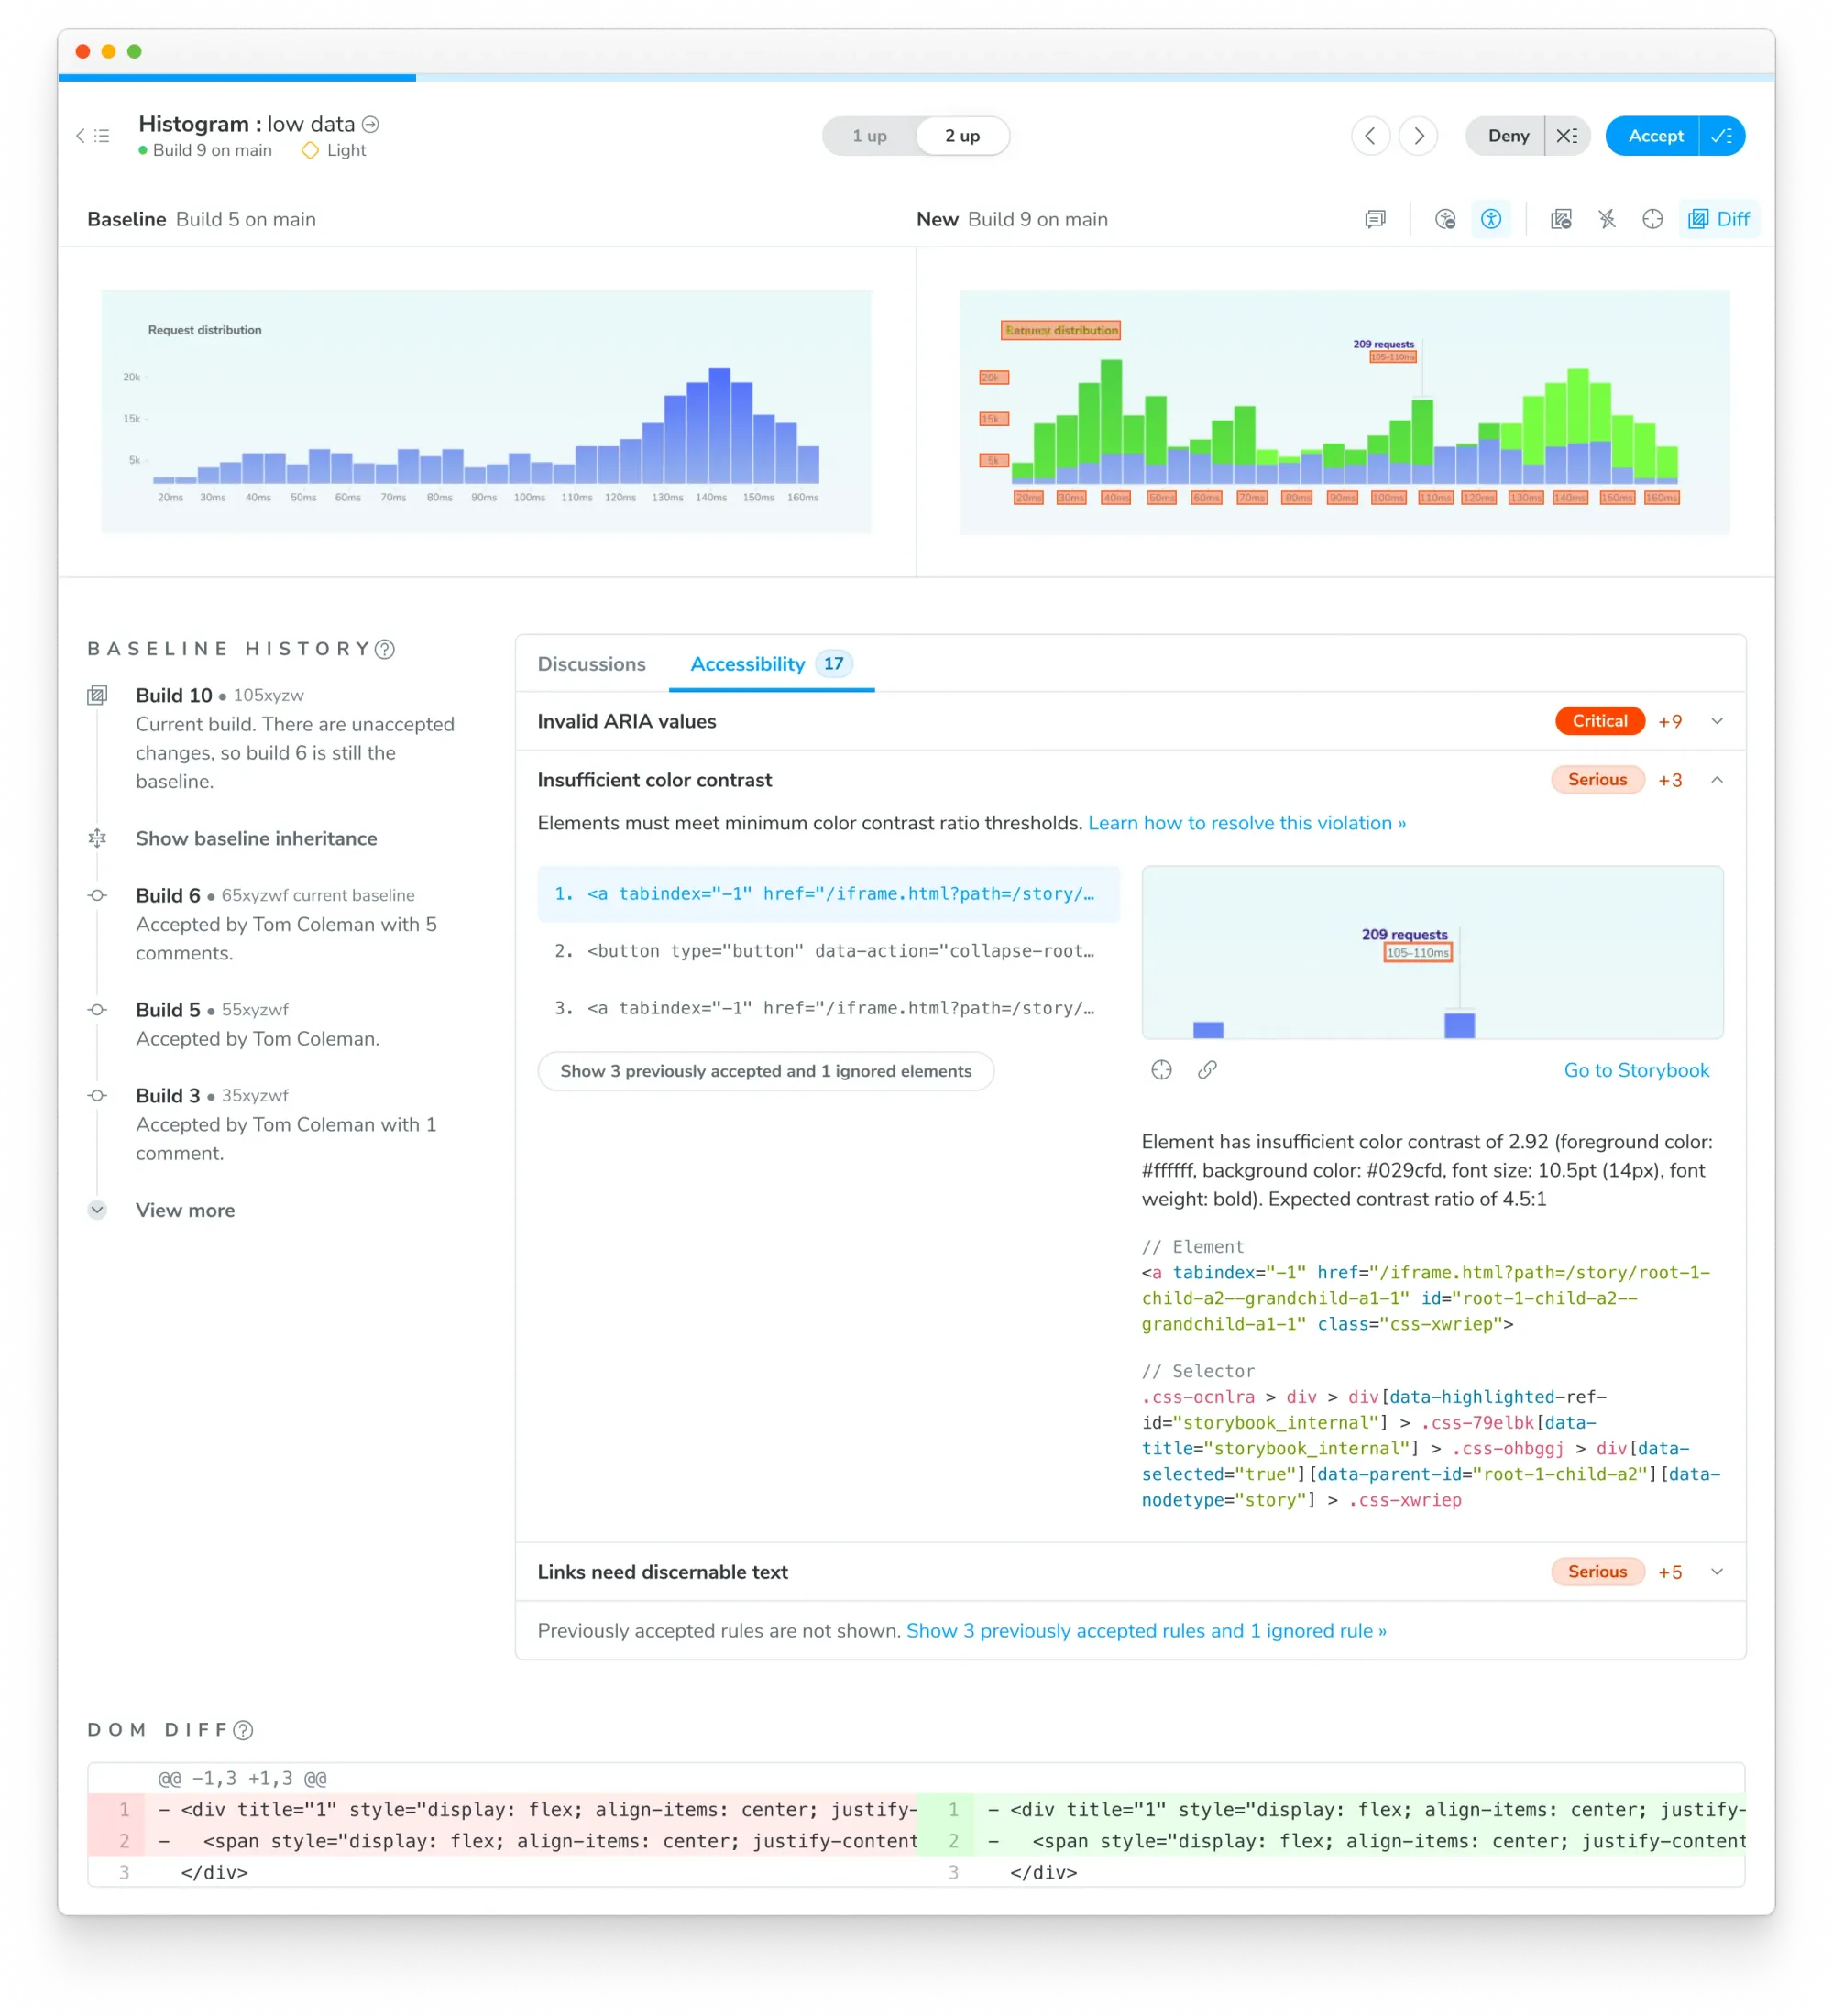
During development, Storybook runs axe on all stories using the a11y addon, providing instant accessibility UI feedback as you make code changes. When you open a pull request, Chromatic takes over launching a fleet of standardized browsers to load all your stories in parallel and run accessibility tests. Chromatic also monitors accessibility violations over time creating a baseline for each story to differentiate between new and existing issues. This helps monitor progress toward and maintenance of compliance with applicable accessibility standards.
What to focus on?
Combining automated and manual testing strikes a pragmatic balance between coverage and effort. With Axe, you can automatically identify an average of 57% of WCAG issues. This creates a fast feedback loop, allowing you to run targeted checks to uncover bugs faster. Similar to visual tests, using stories for accessibility tests also eliminates the need for separate test cases simplifying maintenance.
Verify core user flows with end-to-end (E2E) tests
End-to-end tests are crucial for verifying that users can complete multi-step tasks across various pages of your application. These tests spin up the entire app—including the backend, APIs, and frontend—and simulate user interactions to identify any integration failure points.
Which tools to use?
Playwright is the go-to tool for E2E tests, with Cypress as another popular alternative. Playwright integrates a test runner, assertions, and browser automation APIs into one tool. Its auto-wait capabilities simplify test writing and reduce flakiness. Additionally, it offers solid debugging tools and allows you to run tests in headless mode (without a visible browser UI).
What to focus on?
E2E tests offer a lot of value because they are the test that’s closest to production, and they allow you to assess all parts of the system simultaneously. However, there are trade-offs involved.
Testing the complete application requires significant infrastructure work. You need to build a test environment that deploys all parts of your system together—frontend, backend, and other services—and seed test data. Additionally, E2E tests are more complex, difficult to write, and take longer to execute.
E2E tests have their uses but also their limitations. Be cautious about over-investing in them for most use cases, and instead rely on them to verify the critical user flows of your app and pair them with component tests, which run faster.
Automate test runs with Continuous Integration
Developers spend 21% of their time fixing bugs. Investing in tests allows you to catch bugs faster, but only if you run them consistently—during development and at the pull request stage before merging into production.
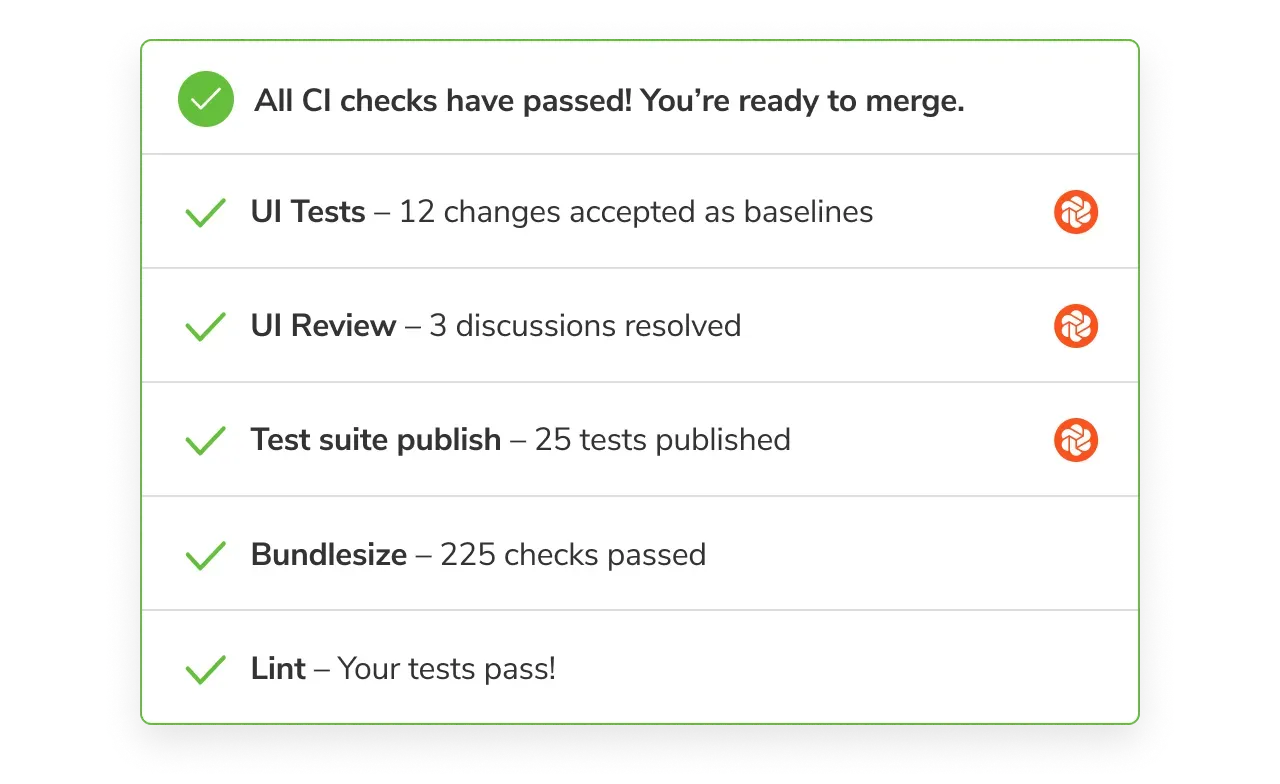
This is where Continuous Integration (CI) becomes essential. By automatically triggering your entire testing suite on every code push, CI ensures that tests run continuously, rather than being an afterthought. This transforms tests from optional safety checks into mandatory quality gates.
The results are reported in the pull request for everyone to review, ensuring the entire team maintains consistent quality standards. Ultimately, this shifts development from reactive debugging to proactive bug prevention.
Best practices for UI testing
We’ve discussed various types of tests and how to use them effectively. Here are some considerations to help you get the most out of type of UI testing that you use:
- Prioritize critical code: Focus on testing critical components, especially those used frequently, and essential user flows first.
- Focus on single responsibility: Ensure each test validates one specific behavior or variant of a component. This approach makes it easier to identify the cause of a failure.
- Optimize execution order: Run faster, more cost-effective tests, such as unit and interaction tests, before E2E tests. This helps identify failures quicker, as E2E tests usually require significantly more setup and execution time.
- Leverage coverage tools to pinpoint untested lines of code and monitor changes in test coverage over time.
- Mock dependencies, such as APIs or databases, to create predictable test conditions and speed up test execution.
- Ensure consistent test environments: Run UI tests in a uniform environment to prevent false failures caused by variations in browser versions, OS features, or other limitations.
Incorporate manual testing strategically
Automated testing is often, but not always, the best option. Other times, it’s the less practical choice. For instance, manual testing can be more cost-effective for UIs with very short lifespans, such as a promotional landing page for a one-time event.
Some aspects of UI testing can't be automated or are too costly to automate. Some examples include testing UIs with screen readers, verifying animations, and testing touch gestures and other mobile-specific interactions.
Conclusion
UI testing doesn't have to be an overwhelming challenge that forces you to choose between comprehensive coverage and development speed. By combining the right tools and strategies outlined here, you can build a robust testing strategy that catches bugs early while keeping your team productive.
The key is leveraging a component-driven approach to testing. With Storybook, you capture component test cases as stories during development. These same stories then power your interaction, visual, and accessibility tests. This eliminates the traditional overhead of maintaining separate test suites for different testing dimensions. When paired with Chromatic's cloud infrastructure, you get reliable testing with unlimited parallelization making your test runs more efficient.
Effective UI testing is about building confidence in your code rather than aiming for arbitrary coverage metrics. Beginning with your most critical components and user flows provides critical coverage and stability to our core elements. From there you can gradually expand coverage as your application grows achieving more scalability in testing and shipping without sacrificing consistency. Investing in testing infrastructure upfront saves time by catching bugs earlier in the development cycle and improving both developer workflows and user experience.